DIY ProteinSkimmer Mümkün mü?

Üye imzalarını sadece giriş yapan üyelerimiz görebilir

Üye imzalarını sadece giriş yapan üyelerimiz görebilir

İlker Bey,
Az önce gezinirken bulduğum iki ayrı DIY Skimmer iler ilgili linkler ve orijinal metinleri/resimleri aşağıda.

Larry Jackson's Skimmer for Dummies
Here is a list of parts necessary to build a PVC Foam Fractionator (FF). This will build a unit roughly 54-inches tall. The contact area of the FF is about 48 inches. I have heard it suggested that 30 inches of contact height is necessary to achieve adequate removal of dissolved organics, so making the unit as much as 18 inches shorter would seem to be okay. It is quite possible that adequate function can be achieved with even shorter units since the water takes a tortuous path to the bottom of the unit when sufficient air is being introduced.
| Part | Number | Description | Diagram | Universal Part # |
|---|---|---|---|---|
| 1 | 1 | 4-inch PVC DWV plug (modified) |  |
450-040 |
| 2 | 1 | 4-inch PVC DWV adapter (modified) |  |
435-040 |
| 3 | 1 | 4-inch by 2 inch PVC DWV bushing (modified) |  |
437-420 |
| 4 | 1 | 6-inch Sch 40 or 80 clear PVC |  |
none |
| 5 | 1 | 2-inch PVC male adapter (modified) |  |
436-020 |
| 6 | 1 | 3-inch by 2-inch SxT PVC bushing |  |
438-338 |
| 7 | 1 | 3-inch SS PVC Coupling |  |
429-030 |
| 8 | 1 | ~ 4-inch length of 3-inch diameter Sch 40 PVC |  |
none |
| 9 | 1 | 3-inch by 3/4-inch SST PVC tee |  |
402-334 |
| 10 | 1 | 3/4-inch mpt by 3/4-inch nylon barb fitting | |
none |
| 11 | 1 | ~36-inch length of 3-inch diameter Sch 40 PVC |  |
none |
| 12 | 1 | 4-inch PVC countersunk adapter (use a 3-inch to 4-inch bushing adaptor to attach this to the bottom of part 11). |  |
435-040 |
| 13 | 1 | 4-inch PVC countersunk mpt plug |  |
450-040 |
| 14 | 1 | 1/4-inch mpt by 1/4-inch nylon barb elbow | |
none |
| 15 | 1 | 3/4-inch PVC Sxfpt 90 PVC elbow | |
407-007 |
| 16 | 1 | ~36-inch length of 3/4-inch diameter Sch SDR21 PVC |  |
none |
|
B C D E |
2 1 1 1
1 |
3/4-inch plastic close nipple (see text) 3/4-inch plastic gate valve 3/4-inch SST PVC tee ~36-inch length of 3/4-inch diameter Sch SDR21 PVC |
 |
none 402-007 none 406-007 |
| Number | Description |
|---|---|
| 1 | roll of 3/4-inch teflon tape (for threaded parts) |
| 1 | 1/4 pint PVC cleaner |
| 1 | 1/4 pint PVC glue |
| 1 or 2 | air diffuser (3 inches or larger) |
| 1 or 2 | 3/16-inch rigid airline tubing |
| 1 or 2 | strong air pump |
 Ed. note
- Part 11 is variable length, see opening paragraph.
- Parts 16 and D are variable depending upon Part 11.
- S and T refer to Slip fitting or Threaded fitting on PVC parts (i.e. SS, both ends are slip fittings, SST, two ends are slip fittings, one end is threaded).
- mpt - Male Pipe Threading.
- fpt - Female Pipe Threading.
Table 3. Modified Parts
| Part # | Modification |
|---|---|
| 1 | 3/16-inch hole drilled for rigid airline |
| 2 | 7/16-inch hole drilled and tapped with 1/4 inch mpt threads |
| 3 | Inside lip removed to allow clear PVC to pass into foam collection cup to form collecting reservoir |
| 5 | Slip portion of adapter cut down so that minimum clear PVC is covered |
| 9 | 1 1/4-inch hole drilled to install Part 15. (Do not install Part 15 until Parts 9 and 11 have been glued together. The elbow must clear Part 11 on the inside and leave room for Part 16 to be installed. See side view). |
 Parts A through E are for the outflow of the FF. One close nipple (A) screws into Part 15. The gate valve (B) is screwed onto the other end of thi s nipple. The other nipple (A) connects the gate valve (B) to a tee (C). The tee provides a siphon break for the 3/4-inch thin wall PVC (D) that goes to the sump in such installations. The 3/4-inch thin wall PVC has an elbow (E) at the bottom to reduce splash of water entering the sump. Note in side view that the elbow is near the surface level of water in the sump (SD) to minimize problems associated with bubbling and splashing. I also stuffed a loose piece of plastic DLS material into the exhaust e nd of the elbow to further reduce bubbling and splashing with the added benefit of quieting the exiting flow. Unfortunately, this plastic will collect fibrous material and cause some clogging over time, but is easy to clean. A short piece of 3/4-inch th in wall PVC installed in the upward pointing part of the tee will provide overflow protection and reduce a bit of splash that can occur at this location. I made the upper piece four inches tall.
This parts list assumes use of soft vinyl 3/4-inch tubing connecting the FF to a surface extractor at the tank. I use an Otto 2000 or Hagen 801 (or 802) powerhead to return water from a Rubbermaid deep dishpan to the tank via 5/8-inch soft vinyl tubing. I installed a 1/2-inch plastic boiler drain valve in the return line to balance the FF flow with the return flow from the sump. Note that the return enters the tank at water level so that back siphon problems are avoided when the pump is off. I used a 7 1/4-inch tall 4-inch diameter PVC section to support an inverted 2-gallon water bottle in the sump for evaporation/kalkwasser addition. I drilled a hole in the base of the 4-inch PVC for circulation in the base of the evap/kalk support.
 The FF could be easily adapted to gravity feed back to a tank and be supplied by a powerhead. I set the first one I built up in this manner, but prefer the sump-type installation since I found it easier to balance surface skimming with evap/kalk additions. The surface extractor insures maximum removal of surface films, efficient foam fractionation and better light transmission onto th e water. A surface extractor is a prefilter that does no filtering (although filtering can be added easily if desired). I build surface extractors out of 1/4-inch acrylic. Although they are a bit more complicated to build, I would suggest strongly that you build or buy one to feed surface water to any foam fractionator.
The diagram should allow assembly without further explanation. It is best to trial fit parts if there is any question. Vaseline will allow parts to be firmly seated in place and then taken apart, cleaned and glued when satisfied that everything is correct. All these parts are available from well-stocked hardware stores or plumbing-supply houses. If not in stock, most parts can be gotten ve ry quickly, since all are common. The plastic gate valve is the most expensive part of this FF. Although prices will vary, I estimate that this unit will cost about $30 to assemble.
When adjusting the FF, there is a subtle transition in the bubble filled column where mostly water with lots of bubbles changes to mostly bubbles with a bit of water. I have found that adjusting the gate valve so that this transition point is visible in the clear PVC foam throat is where I get best dry-foam production. Since foam production varies with flow rate and the amount of air injected, you will have to find what works for you. Looking down into the foam throat with the cap removed will reveal some information about foam height in the foam throat also.
There are, of course, modifications that could be made to improve the efficiency and capacity of any skimmer, and this one is no exception:
Charles' Notes
this pump. T hat way you could still use Larry's passive overflow system.
size skimmer you wanted, be it 6 or 8 inches in diameter.
 For further info and assistance in building this skimmer contact Larry L. Jackson
 ![]() Back to the HomePage
Back to the HomePage
DIY Protein Skimmer
This DIY project is entirely realised, written, photo and video documented by Dale - theaquaticcafe.blogspot.com All rights reserved © Do not copy without a written permission, please.
11/14/2006


I lined the intake and outlet of the pump up against the water bottle, marked, and then cut out holes for the bulkheads. I cut the rough holes with the cut off disc and smoothed things out with the sanding barrel.

posted by Dusko Bojic @ 8:41 AM ![]()
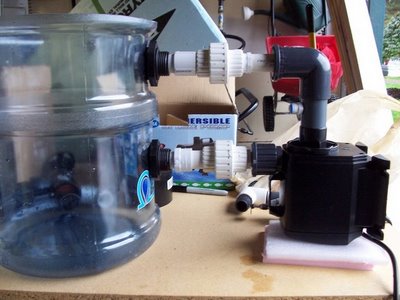
Next I installed a bulkhead and fittings for the skimmer returnline (water out of skimmer).

This is a view looking down at the guts of the skimmer. On the left there are the recirculating pumps feed and return bulkheads (the elbow at the bottom directs the return flow in a circular pattern). On the right is the skimmer feed and return bulkheads (again, the elbow directs the feed flow in a circular pattern).
First I cut a little off the top to make it thinner than the base flange

It sits in place nicely

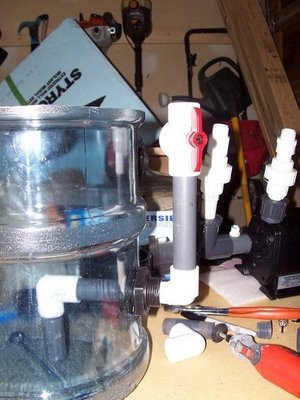
I also cut the lip off the neck of the bottle so that 1 1/2" PVC would fit. The PVC is also secured for now with silicone.

And here's the skimming unit in a 50G. sump.

Somethings happening!!!


After a bit I dumped the skimmate back into the sump and adjusted the gate valve to allow for a more wettish skimming flow. This is after 1 hour of wet skimming.
The DIY protein skimmer video click here, please!
All rights reserved !
posted by Dusko Bojic @ 8:21 AM ![]()
Üye imzalarını sadece giriş yapan üyelerimiz görebilir

Üye imzalarını sadece giriş yapan üyelerimiz görebilir
Üye imzalarını sadece giriş yapan üyelerimiz görebilir


Üye imzalarını sadece giriş yapan üyelerimiz görebilir

Üye imzalarını sadece giriş yapan üyelerimiz görebilir
Üye imzalarını sadece giriş yapan üyelerimiz görebilir

Ekleme:
Bunlar da benim arşivdeki diy skimmer çalışmaları
http://home.comcast.net/~danleyjr/skimmer/GeoffSkimmerBuild.htm
http://www.randystacye.com/diythreadwheel.htm
http://reefkeeping.com/issues/2002-06/fm/feature/index.php
http://www.randystacye.com/diy_needle_wheel_skimmer4.htm
http://camelreef.free.fr/skimmer/skimmer.html
http://www.reefworkshop.com/DIY_proteinskimmer1.htm
Üye imzalarını sadece giriş yapan üyelerimiz görebilir
Ekleme:
Bunlar da benim arşivdeki diy skimmer çalışmaları
http://home.comcast.net/~danleyjr/skimmer/GeoffSkimmerBuild.htm
http://www.randystacye.com/diythreadwheel.htm
http://reefkeeping.com/issues/2002-06/fm/feature/index.php
http://www.randystacye.com/diy_needle_wheel_skimmer4.htm
http://camelreef.free.fr/skimmer/skimmer.html
http://www.reefworkshop.com/DIY_proteinskimmer1.htm
[/QUOTE]
Üye imzalarını sadece giriş yapan üyelerimiz görebilir

Şu konuya baktınız mı ?
Mesajın birinde yabanci forumlardaki bir üye ps yi bu sistem sayesınde sökmüş denmiş
[QUOTE=roadkingtr]Emre Bey Merhaba,
Üye imzalarını sadece giriş yapan üyelerimiz görebilir
Üye imzalarını sadece giriş yapan üyelerimiz görebilir

Üye imzalarını sadece giriş yapan üyelerimiz görebilir

Arkadaşlar ufaktan tuzluya geçmeyi düşünüyorum.
Böyle bir PS yapayım diyorum faka aklıma birşey takılıyor.
Bu toplama kabınabiden kısım varya noktayla gösterilmiş onun yüksekliği ne kadar olacak yani fazla yaparsak köpüklerin çoğu yukarı çıkmaz az yaparsak köpükler fazladan suyla taşar yardımcı olursanız sevinirim
Üye imzalarını sadece giriş yapan üyelerimiz görebilir