Brüt 432 ml Pico İwagumi Yeni tasarım sayfa 2

Akşam konferans yapılıyor. ;) Pazar da bi buluşma ayarlarsak harika olur. Ümit e de uçak bileti yollarız artık

[/QUOTE]

Sana şilep bile yollarız abi ayıp ettin, hatta o şilepi Ankara'ya bile. (çok abartı oldu bu
 )
)Üye imzalarını sadece giriş yapan üyelerimiz görebilir

| Orjinalini yazan: batuhanbayram |
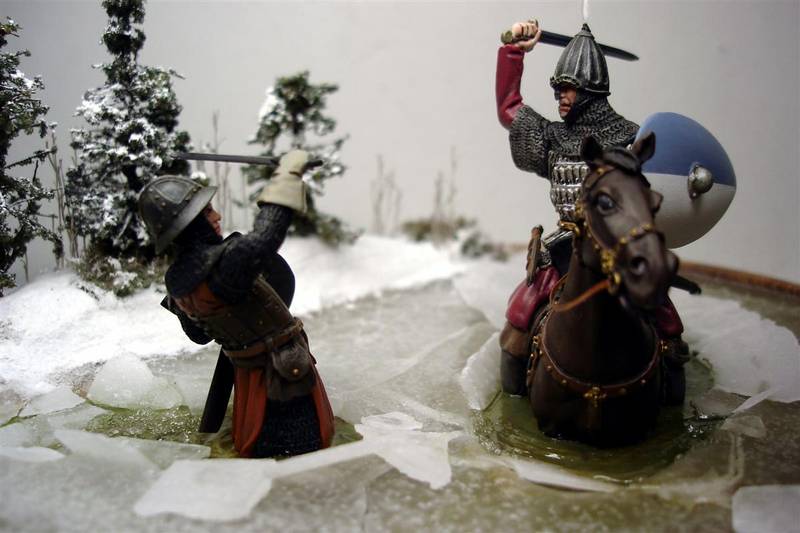
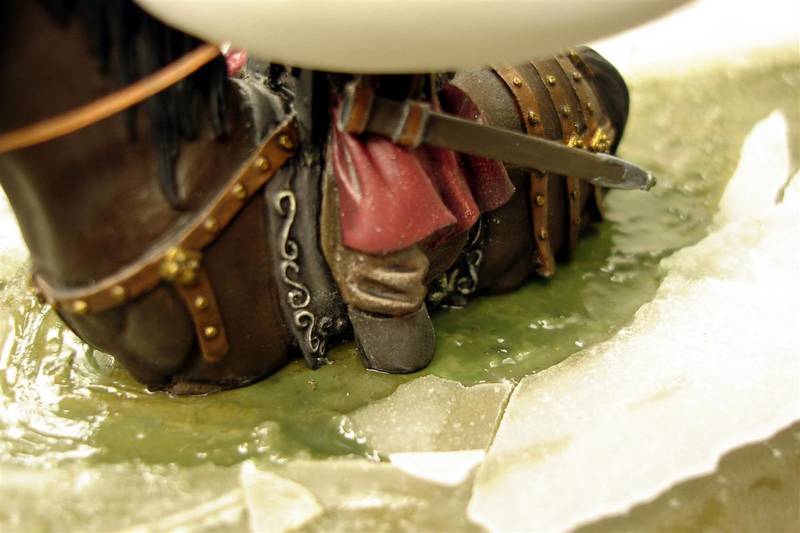
| Göl ve nehir efekti için en doğal görünümlü yapım şeklini buldum ama ingilizcesi çok iyi biri lazım ki bizim için çevirsin. Örnek fotoya bakar mısınız. |

Üye imzalarını sadece giriş yapan üyelerimiz görebilir

Güzel bir model sitesi buldum, burada su efektleri diye bir bölüm var, İşte bölümün linki . Buyrun tıklayın . Tıklayın .
Siteden birkaç örnek resim .

Birde şöyle bir açıklama buldum ama çevirmeye ingilizcem yetmedi bazı bölümlerini .
MODELLING WATER ON YOUR RAILWAY.
Depicting water on a model railway layout is no longer the problem it used to be. By using any number of methods, nine of which are described in these notes, water can be easily represented on your model railway.
Select the one, which best suits your needs! But do not forget to experiment with variations or your own methods and ideas, you may surprise yourself with what you achieve.
REAL WATER
Real water is not model water and therefore is not suitable for use on a model railway.
You could possibly bend the rules if you are using L.G.B. or one of the larger live steam scale models in the garden, but the final effect would still be questionable.
You just cannot get water to reduce the size of its ripples to match the scale you model in. In H.O. or N scale and definitely in Z scale the smallest ripple is a tidal wave.
This phenomenon is often evident in older movies where model boats have been used. The bow waves or the waves of the ocean never match the scale of the model boat! Modern movies have improved on
the past attempts by increasing the size of the model, but you can still tell it is a model in a pond!
2. PAINTED AND VARNISHED PLASTER
This was the accepted method for modelling water for many years and there are still modellers, particularly in England, who can achieve outstanding results using this method.
The surrounding topography is created and a depression left for the expanse of water. Pouring a sloppy plaster mix into the depression creates the area of water to be modelled. All air bubbles are removed and the plaster is left to set. If a smooth water surface is required no further action is required. If a rippled or waved surface is required the plaster is worked into the required pattern as it cures.
Once the plaster has thoroughly dried the water surface is painted with blues, greens or browns to represent the type of water being modelled and then given a number of coats of full gloss varnish to
achieve the wet look.
The key to this method is to be able to paint the water surface realistically.
3. PERSPEX
Perspex or any of the other clear "plastic" sheets have replaced glass as the medium to represent a sheet of smooth water. Glass was always susceptible to breakage with the ever-present possibility of cut fingers or hands.
If you wish to model the below water level detail this method is very difficult to execute as the scenery has to be modelled in two layers. The scene below the water level has to be created, the perspex water surface added and then the above water scenery completed to match that below the water level.
It is very difficult to match the two layers of scenery!
4. WATER PAPERS
There are a number of commercial water papers or plastic sheets available in hobby shops today. Unfortunately they all suffer from the same drawback; they repeat the same pattern over and over
again!
They can be inserted into the scenery and the banks built out over them or you can trim them to the shape of your water feature and insert the profiled water surface after the scenery is completed.
Either way will work.
5. VARNISH
For smaller areas of water, such as dams, small lakes, creeks and puddles, a number of thin layers of any cheap brand of full gloss varnish can be poured into the pre-detailed area to achieve a quite
realistic representation of water. The varnish dries a cold tea colour that is suitable for most water areas except the sea.
The site for your water feature is modelled and the bed detailed if shallow or painted to represent depth if this is your preference. A layer of varnish is added to the prepared area and will undoubtable soak into the scenery. The second application may also soak in but eventually the "water" will stay where you want it.
Do not add the next layer of varnish until the first one has set and only add successive layers until the required depth is obtained.
With this method patience certainly is a virtue, but the final effect is worth the wait!
The method is slow, it can take a fortnight to complete a pour and the first few applications invariably soak straight into the scenery but it is the cheapest way I know to represent water.
6. "PLASTIC" WATER
This method uses any of the fibre glassing resins (not casting resins) to represent water with ease and can produce water of reasonable depth. The resin can be tinted to produce the water colour you desire.
To create your expanse of water, the area is first formed, sceniced and the bed of the river or lake is detailed. If you wish to represent depth in your water the middle of the depression should be painted a dark brown or black and the colour lightened as you work towards the bank.
The depression is then filled using a two-part fibre glassing resin.
Tins of both parts of the "model water" are available here in Victoria as Four Seasons Fibre Glassing Resin from ONE STOP PLASTICS Pty. Ltd., 19 Ardena Court, East Bentleigh. (03) 579.2044
The water produced is strong, flexible and slightly tinted if you use it "as is".
With time the surface may dull but it can be rejuvenated by polishing with a very fine wet and dry paper or just give it a coat of full gloss varnish.
The only downfall with this method is the cost! A reasonable size river with a modelled depth of about 20 mm. could cost as much as $35 to $40 to pour.
7. WOODLAND SCENICS PLASTIC WATER
A reasonably new product onto the market the "water" is supplied as large beads. It is heated until it becomes liquid and poured into your prepared waterway. According to the instructions it is simple to use and it produces a crystal clear representation of water.
My personal experience and discussions with fellow modellers who have used the product have shown that the product can be difficult to work with. If not treated properly your model water can crack as it dries and if care is not taken will certainly crack at the edges once it has cured.
It cures from its molten state rapidly and may need reheating with a hot air gun before you have achieved the effect you desire.
Edit:
Since this article was published Woodland Scenics has produced a new product that can be poured without heating.
8. GLOSS MEDIUM
If you need to model running water, or a beach with waves, the product you need is Acrylic Gloss Medium, available from artists supply shops.
The product is a white creamy substance, similar to PVA glue, which artists blend with acrylic paints to change the texture and gloss of the dried paint.
The "water" must be poured or spooned into the prepared water bed and worked to the edges. The surface can be worked into ripples, troughs or waves and it dries to a gloss finish.
9. CRYSTAL CLEAR SILICONE
There are a number of these products on the market today and any of them will produce a representation of clear rippled water. The silicone that can be cleaned up with water is definitely recommended.
The silicone is applied to the prepared watercourse and must be worked into shape with wet fingers or an old kitchen knife that is kept wet. This can be a messy job and unless you are very careful
you tend to get "water" all over your hands, your cloths and your scenery.
We all know what it is like to work with silicone, but if used carefully a reasonable representation of water can be achieved using this method.
10. ADDING RIPPLES
The methods for creating your water outlined in suggestions 3, 5, 6, and 7 all produce a smooth water surface. If you wish to add ripples or waves to your water, it can be done by forming the crests and depressions with either GLOSS MEDIUM or CRYSTAL CLEAR SILICONE.
11. CREATING WATERFALLS
Modelling waterfalls can be a task fraught with frustration and heartbreak. Because of the nature of the feature it is difficult to model, but it can be done, well almost any way!
Here are three methods I have used to produce a reasonably realistic model of a waterfall.
Clear silicone sealer is spread onto a sheet of glass to form a long thin strip, the width of the required waterfall. If the glass is smeared with Vaseline or petroleum jelly before the silicone is added it will be easier to remove. Once the silicone has dried, peal it from the glass and you now have a waterfall. The silicone strip can be glued in place with a blob of silicone in the prepared area with the smooth face inwards. Adding a touch of full gloss varnish to the waterfall and adding some off-white foam at the base of the drop will give your waterfall a better appearance.
Another method, which also uses silicone sealer, is to reinforce the strip longitudinally with thin clear plastic filaments. When I used this method to produce a waterfall, I obtained the filaments from an old T.V. light that consisted of a spray of thin clear plastic fibres illuminated by a coloured light. The reinforcing produces a hint of vertical fall in the waterfall and also gives the silicone some body so that it is easier to handle.
A simpler method is to glue clear plastic strips into position and to coat them with full gloss varnish. If the varnish can be poured into the river above the falls and let run down and over the falls it does produce a good representation of a waterfall. Again add white water and ripples below the falls to give the correct effect.
Good luck with modelling your water.
Su efektini sağlayan materyalleri satan bir site buldum sanırım :))
Eminim daha çok şey de bulabiliriz
Üye imzalarını sadece giriş yapan üyelerimiz görebilir
 serkan_cetinkolÇevrim Dışı
Kıdemli Akvarist
[C]2,2,4700[/C]
Kayıt: 14/06/2005
İl: Istanbul
Mesaj: 3895
Üye imzalarını sadece giriş yapan üyelerimiz görebilir
Abi cidden çok ama çok iyi el işçilikleri yapmımşlar, birkaç tanesini görünce ağzım açık kaldı resmen . Bu hobiye de mi el atsak ne
Abi REİS (Ümit Tunç) i aradım ve dediğim gibi onay verdi, bakalım umarım bizde güzel şeyler yapıcaz . Yapıp octopusa göndeririz, su öyle yapılmaz böyle yapılır diye
Üye imzalarını sadece giriş yapan üyelerimiz görebilir
Ben kullandığın moss hakkında birşey eklemek istiyorum.Kulllandığım moss Timur Eker' hocamızdan duyduğuma göre su altında güzel ışık alan bir yerde adaptasyon sağlayıp gelişebiliyor.
Üye imzalarını sadece giriş yapan üyelerimiz görebilir

Üye imzalarını sadece giriş yapan üyelerimiz görebilir


Üye imzalarını sadece giriş yapan üyelerimiz görebilir
Konu hakkında genel bilgilendirme .
Bitkiler su içi adaptasyonu gerçekleştiremiyorlar ne yazıkki . Su dışında günlük sulama ile yahut çok nemli ortamda yaşatmak mümkün . Evrim kardeşim bu bitkiye benzeyen çok bitki var, belki başka bir bitkidir .
İzzet bey teklifiniz için teşekkür ederim Düşünmeniz yeter . Şu an için picolara bir ara verdim, ilerleyen haftalarda yeni picolar yapıcam ama bu sefer dry start olmuycaklar . Büyütülüp sürdürülebilir picolar yapmayı hedefliyorum, her ne kadar minik hacimde stabilizasyon zor olsa da mümkün değil diye birşey yok
Su konusunda ise birçok çözüm bulduk ancak tam olarak kafamızdakini yakalayamadık, araştırmalara devam ...
Üye imzalarını sadece giriş yapan üyelerimiz görebilir
Su konusunda beni de bir şey denedim, Serkan sağolsun. (Serkan Çetinkol). Uzun zamandır konuşuyoduk. Güzel bi fikir verdi bende, kendi adıma baya bi denemeler yaptım. Şimdilik küçük bi şey yaptım en kısa sürde fotoğraflarını eklerim. Serkan'dan da fotoğraf bekliyoruz artık.
Üye imzalarını sadece giriş yapan üyelerimiz görebilir
Üye imzalarını sadece giriş yapan üyelerimiz görebilir
Üye imzalarını sadece giriş yapan üyelerimiz görebilir

Üye imzalarını sadece giriş yapan üyelerimiz görebilir
 Adam çok sıradışı gerçekten. Neyse bizde farklı yöntemler bulduk ve bulmaya devam edicezde :))
Üye imzalarını sadece giriş yapan üyelerimiz görebilir